

How To Reinstall Windows 10 To A New Drive
If you've just upgraded your PC and want to migrate Windows 10 to a new hard drive, you'll have to consider your options. This is a job that beginners might struggle with, but information technology doesn't have to exist—you just need to figure out how you're going to move your files from A to B and ensure Windows will boot from your new drive.
There are a few ways you can practise this. You could create a new organization prototype to migrate from ane drive of equal size to some other. Alternatively, y'all could consider cloning your hard drive to copy your installation, especially if your drives are different sizes. Here's what you'll need to do to begin the process.
Before Yous Move Windows 10 to a New Hard Drive
Before you consider a transfer of Windows 10 to a new hard drive, you lot should consider backing up your essential files, independently of any new system paradigm you create.
While this process shouldn't have an impact on your original drive and files, you may cause data loss if you accidentally overwrite your initial bulldoze in the process. To be sure that your data is safe, you should ever perform an independent backup of your files using portable media (such as a USB bulldoze) or online cloud storage.
One time you lot've backed up your essential files, you'll accept 2 options to consider. The process to movement Windows x to a new hard drive depends on if yous're moving to a drive of equivalent or larger size or if the drive is smaller, as the procedure will vary.
Information technology doesn't matter if you're moving from a traditional drive to a hybrid or solid state drive, every bit only the size of the drive itself matters. If you're moving to a drive of equivalent or larger size, yous're free to create a system image to clone your bulldoze using Windows' own congenital-in organisation imaging tools.
Even so, if you're moving to a drive that'south smaller than the original, you won't be able to utilise this method, as Windows will bear witness an error during the re-imaging procedure. Instead, yous'll need to transfer Windows 10 to a new hard drive using third-party tools that volition let y'all to copy the files successfully to the smaller drive.
Create a New System Image to Migrate Windows to Drives of Equivalent or Larger Size
If you lot want to migrate Windows 10 to an equivalently-sized or larger difficult drive than the original, the all-time method is to use Windows' ain system imaging tool. This will allow you to copy your original bulldoze exactly to your new drive.
It'due south important to stress that this method only works if yous're using a drive of equivalent or larger size. If it'southward smaller, you'll demand to follow the steps below to use a third-party tool instead.
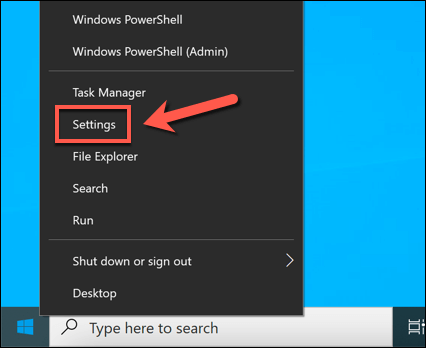
- To brainstorm, you'll demand to create a new organisation image for your Windows installation. To exercise this, right-click the Start menu and select the Settings option.
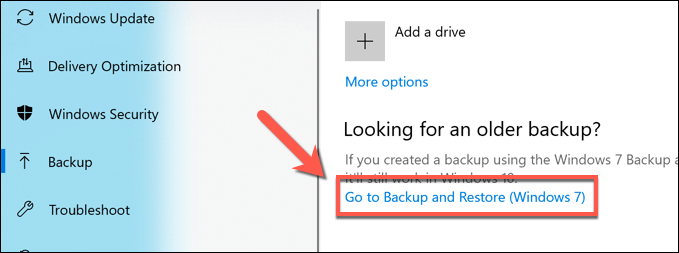
- In the Settings menu, select Update & Security > Backup. In the Backup menu, select the Get to Backup and Restore (Windows 7) option, listed nether the Looking for an older backup? category.
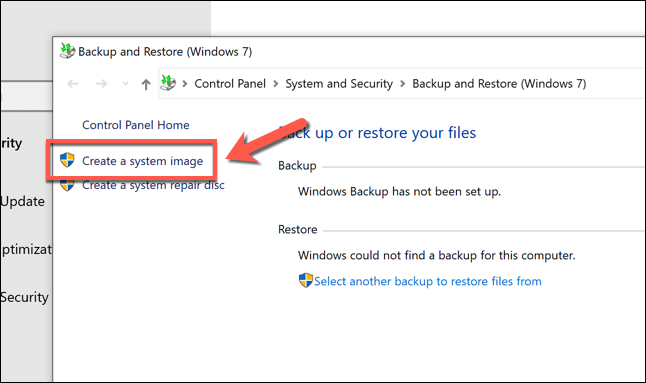
- In the older Control Panel window, select the Create a system image option, visible in the left-mitt menu. Brand certain to connect an external bulldoze (such equally an external USB difficult drive) at this point, unless you lot plan on using a network location to store your arrangement epitome (such as a network attached storage device).
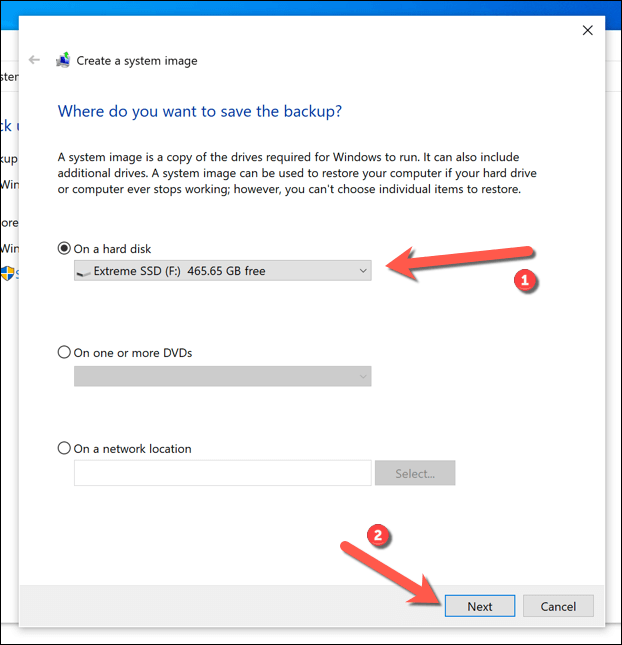
- A new Create a organization image carte du jour volition open and automatically begin scanning for a suitable external bulldoze or network location to store the system image. If you lot're using a portable hard drive, select this from the On a hard disk drop-downward menu. If you're using a network storage location, choose the On a network location option, then select a suitable location on your network to store the file. Select Adjacent to continue.
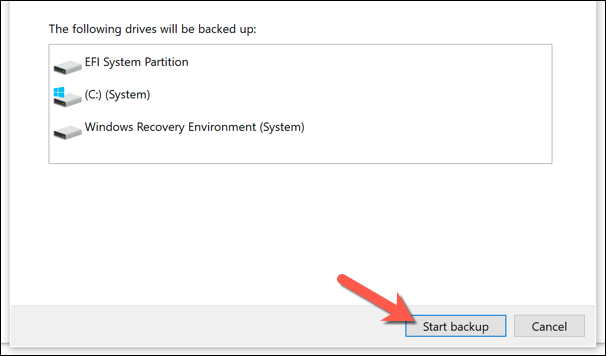
- Windows will confirm the partitions on your drive that will exist copied to the new system image. Select Start backup to brainstorm.
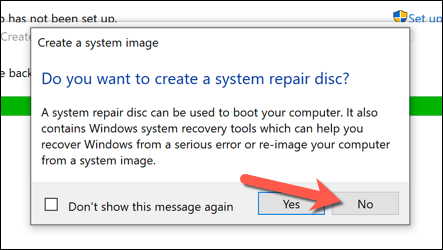
- Allow the system image cosmos process to finish. Once completed, Windows will ask you if y'all want to create a new arrangement repair disk. It may be a good idea to do this, specially if you manage to corrupt your MBR or GPT boot files in the process. However, you lot tin can select either Yes or No to go on.
After creating the new arrangement image, you're ready to utilise information technology on your new drive. At this stage, connect your new hard drive to your PC and remove the existing hard bulldoze. You could likewise leave your existing hard drive in place and format it, allowing you to repurpose it as a secondary storage bulldoze.
Use a System Prototype to Move Windows to a New Hard Drive
With a new arrangement image of your existing bulldoze ready, you lot can use the image to create a complete copy of your Windows installation on a new hard drive. Equally we've mentioned previously, y'all can only do this if the new bulldoze is the aforementioned size or larger than the previous system drive.
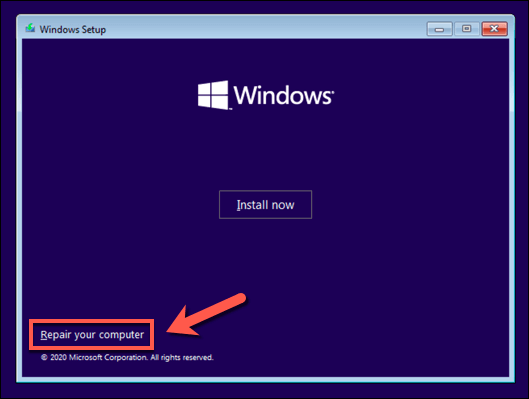
- To begin, insert your Windows installation media using a portable USB memory stick or DVD. Once inserted, kicking your PC and ensure that your BIOS or UEFI settings prioritize that bulldoze over any other drives. Once the Windows installation bill of fare appears, select Adjacent, then select Repair your computer in the bottom left corner.
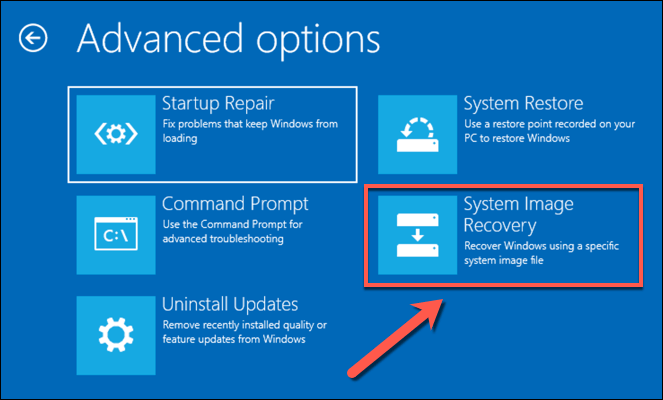
- In the Advanced Options carte du jour, select Troubleshoot > System Prototype Recovery.
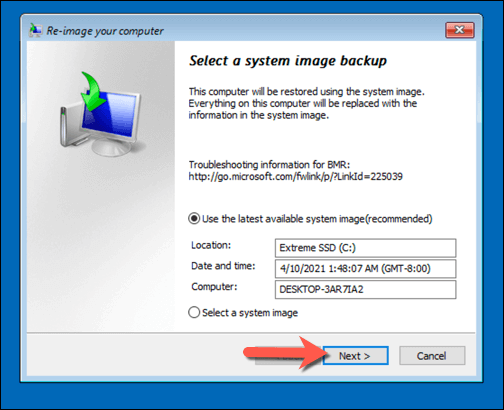
- Windows should automatically discover the organisation image on your external hard drive in the Re-epitome your computer menu. If it doesn't, select the Select a system paradigm option to locate information technology manually. Otherwise, go out the Apply the latest available organisation image (recommended) pick selected, and so select Next to continue.
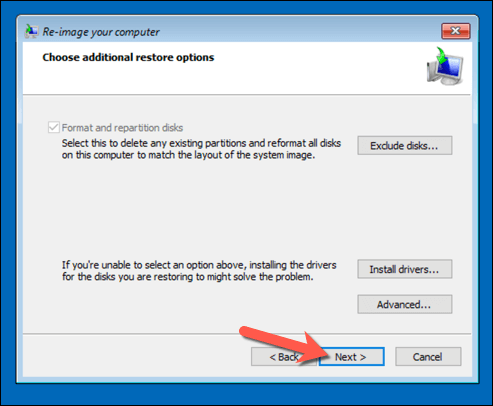
- Using the new arrangement image, your new hard drive volition exist formatted with the aforementioned partitions as the previous drive. If y'all want to exclude whatsoever partitions first, select Exclude disks and uncheck them. Otherwise, select Next to continue.
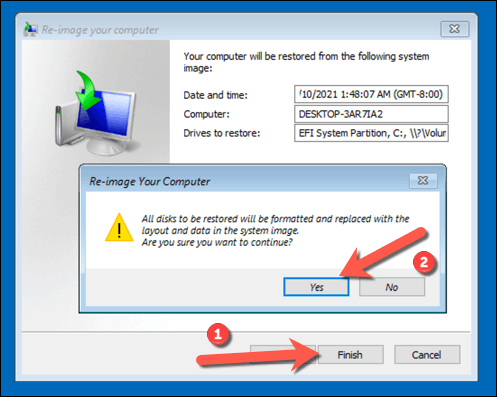
- Select Terminate > Yes to begin the deejay imaging process, which volition take some time to consummate. One time this process is finished, select Restart Now to kick into your PC. You can remove the Windows installation bulldoze or deejay at this bespeak, and you may also need to alter your BIOS/UEFI settings to ensure that the new drive is selected equally the starting time boot deejay.
If y'all've copied your files to a new drive of the same size, you won't demand to do anything else at this phase—Windows will kicking every bit normal, and you can resume using your PC. If you've cloned your bulldoze to a larger sized drive, however, yous may demand to have additional steps to utilize the additional infinite.
Resize the Arrangement Division Later Using a Arrangement Epitome
A system epitome clones your drive entirely, recreating all available partitions on the previous bulldoze to the exact sizes equally the original partitions. If yous've used a system image to move Windows to a larger hard bulldoze, yous'll need to resize the system segmentation (C:) to utilize all of the available space on the new bulldoze.
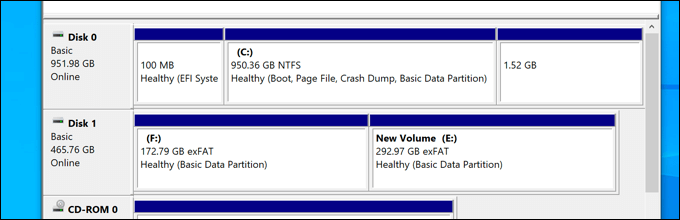
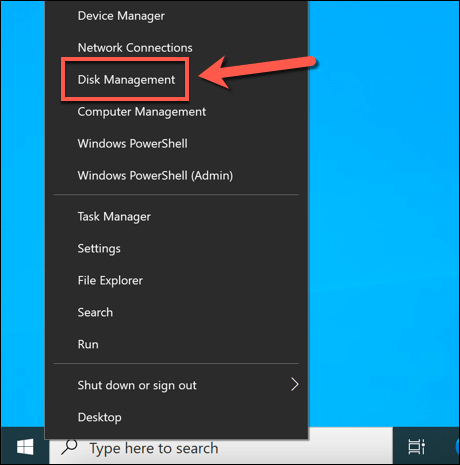
- To exercise this, boot into Windows on your new bulldoze and sign in. Right-click the First menu and select the Deejay Direction option.
- In the Disk Management menu, right-click your system sectionalization (C:) and select Extend Volume.

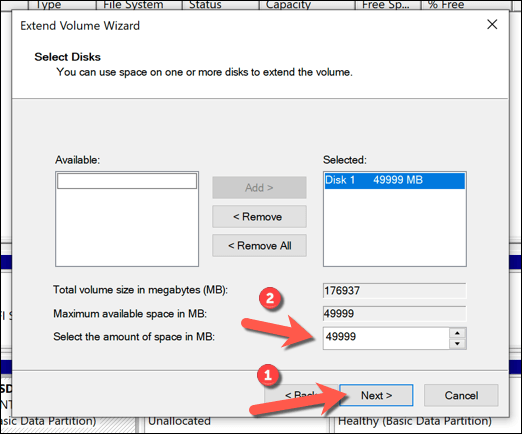
- In the Extend Volume Wizard carte du jour, select Next, then ensure that the amount of additional space (equivalent to the figure in the Maximum bachelor space in MB box) is selected in the Select the corporeality of infinite in MB box. Select Side by side to continue.
- Ostend that the details are right, and then select Finish to consummate the procedure.
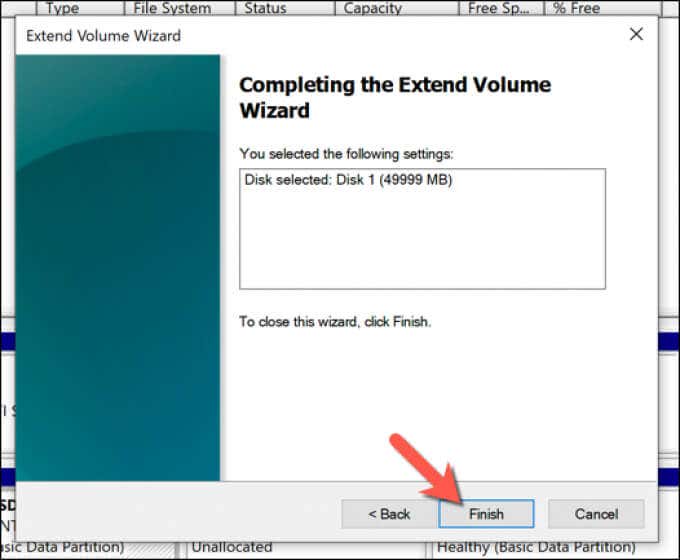
Subsequently a few moments, your system partition volition be expanded to include the additional space on your bulldoze, ensuring that all bachelor bulldoze infinite is usable.
Transfer Windows x to a Unlike Sized Hard Drive Using Third-Party Software
Using a new system image to clone your difficult bulldoze is still the best mode to migrate Windows x to a new hard bulldoze. Unfortunately, as this process doesn't work if you're moving from a larger to smaller drive, y'all'll demand to use 3rd-party software to re-create Windows instead.
Various tools exist for this method, but one skillful (and free) option is to utilise Macrium Reverberate Gratis. The free version of Macrium Reflect allows y'all to clone your Windows installation from a larger to a smaller drive, resizing the division table in the process. You can also use this to clone Windows to a larger driver if you'd prefer.
Before you follow these steps, brand sure that both your existing hard drive and new hard drive are connected to your PC and are detectable in Windows.
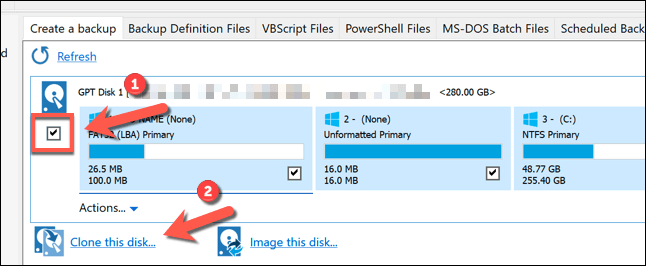
- To begin, download and install the Dwelling Utilize version of Macrium Reverberate Free from the Macrium Reflect website. Once installed, run the software and make certain that the checkbox next to the disk containing your system segmentation (C:) is selected. Once selected, select the Clone this disk option beneath it.
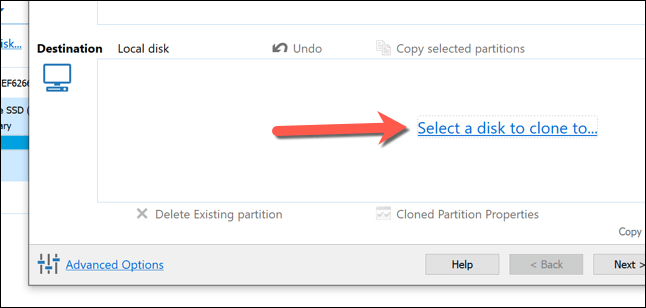
- In the Clone menu, select your new (smaller) bulldoze by selecting the Select a disk to clone to option in the Destination department.
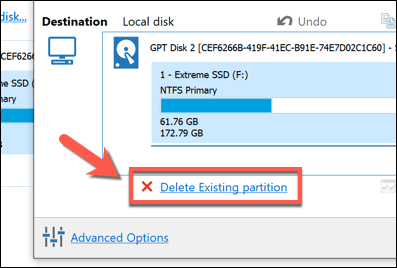
- With the new disk selected, you'll need to delete any existing partitions on the drive by start selecting them in the Destination category, and then selecting the Delete Existing sectionalisation option to remove them.
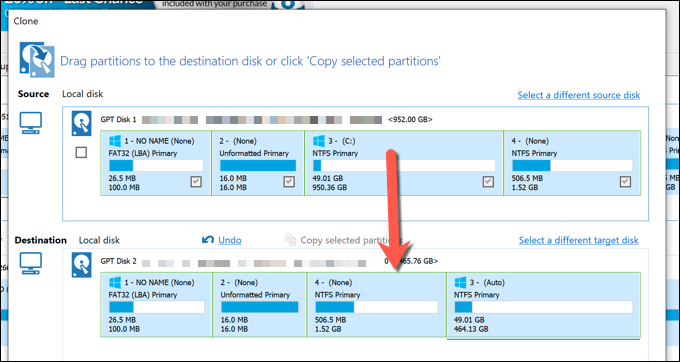
- With any existing partitions on your new bulldoze removed, drag and drop each of the partitions on your drive (excluding the organization C: sectionalization) from the Source category to the Destination category. Leaving your arrangement partition (C:) terminal, drag and drib that partition onto the Destination category.
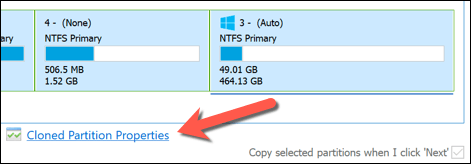
- Macrium Reflect will automatically resize your organisation partition to apply upward the remaining infinite on your new drive if your new drive is smaller than the original. If you'd like to alter the size of your C: segmentation (or you're using a larger drive, so wish to resize it to use upwardly the additional infinite), select it in the Destination category first, then select the Cloned Division Properties pick.
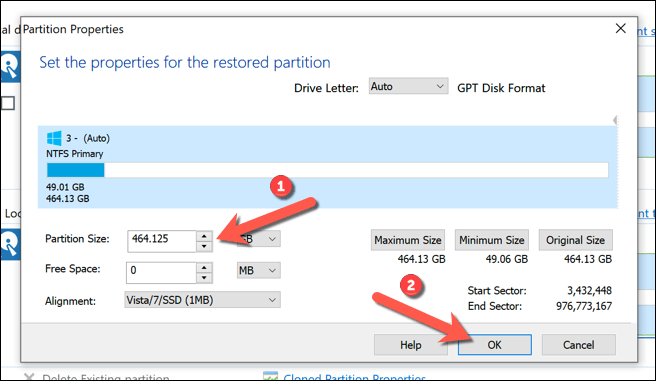
- In the Partitioning Properties menu, resize your partitioning using the Partition Size box. If you're using a larger drive, make sure that the Free Space box reaches 0 MB to ensure you're utilizing all available space. Select OK to ostend the change.
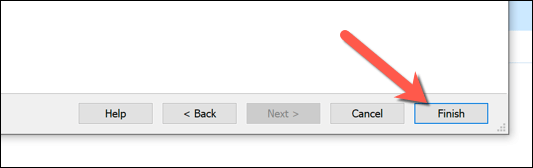
- Select Finish to confirm your cloning options.
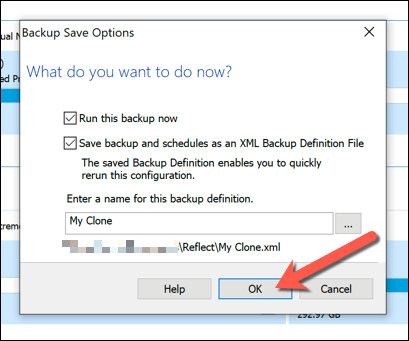
- Leave the options intact in the Backup Save Options bill of fare that appears adjacent, so select OK to confirm.
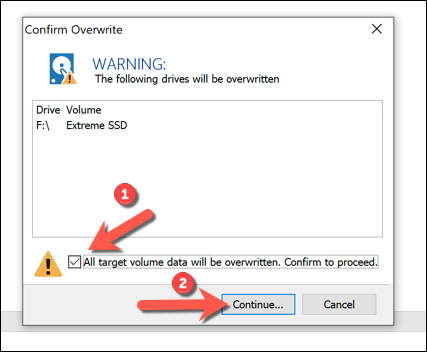
- Macrium will need permission to delete existing partitions and brainstorm the cloning procedure. Select the available checkbox in the Ostend Overwrite menu, then select Go on to keep. Allow some time for the cloning process to finish.
Once completed, your existing hard drive containing your Windows installation and all other files will exist cloned to your new drive. You can shut down your PC and remove your previous difficult drive at this stage, or utilise Disk Management to format and repurpose it instead.
Final Steps
Whether yous're using a Windows x system image to move to a new drive of the same size, or using third-political party software like Macrium Reverberate to clone information technology instead, you'll be ready to boot up and utilise your new drive without any further steps. You lot may need to resize your system sectionalisation if the drive is bigger than the original, all the same.
If yous do run into problems, you may want to consider reinstalling Windows 10 and starting afresh without cloning your drive entirely. You can do this without losing your personal files, only y'all may need to install your software again and transfer your Windows 10 license in the procedure.
Practice not share my Personal Information.
Source: https://helpdeskgeek.com/windows-10/how-to-migrate-windows-10-to-a-new-hard-drive/
Posted by: reedbetheraine57.blogspot.com
0 Response to "How To Reinstall Windows 10 To A New Drive"
Post a Comment